

Table of Contents
- What You'll Need Before Installing Tubeless Tires on Carbon Rims
- Preparing Your Carbon Rim: Cleaning and Rim Bed Setup
- Applying Rim Tape Correctly to Carbon Rims
- Installing the Tubeless Valve Stem and Matching Valve Length
- Mounting and Seating the Tire Bead on Carbon Hooks
- Best Tubeless Sealant for Carbon Wheels and Application
- How to Seat Tubeless Tires Without a Compressor
- Troubleshooting Tubeless Tire Leaks on Carbon Rims
- Frequently Asked Questions
Last Updated: September 27, 2026
What You'll Need Before Installing Tubeless Tires on Carbon Rims
Installing tubeless tires carbon rims requires specific tools and careful handling, as carbon fibre rims are more prone to damage than aluminium alternatives.
Start with quality rim tape designed for tubeless setups to seal spoke holes and create an airtight surface. You'll also need a tubeless valve stem matched to your rim depth, too short won't seal, too long can crack under pressure.
Gather these essentials:
- Rim tape, tubeless-specific, wide enough to cover your rim width
- Tubeless valve stems, matched to your rim depth (typically 40-60mm for carbon rims)
- Tubeless sealant, designed for your tyre type and climate
- Air compressor or floor pump, essential for seating the bead
- Tyre levers, plastic, not metal (metal damages carbon)
- Pressure gauge, accurate to ±2 psi
- Soapy water, for detecting leaks
- Degreaser or isopropyl alcohol, for cleaning the rim bed
Investing in proper tools upfront prevents costly mistakes. A floor pump with a good seal beats a cheap compressor, and quality plastic tyre levers protect carbon rims from gouges.
Check your rim's maximum pressure limit before you start. Carbon rims typically max out at 65-80 psi, depending on the manufacturer's specs. Exceeding this risks delamination or catastrophic failure.
Preparing Your Carbon Rim: Cleaning and Rim Bed Setup
Your rim bed must be spotless for tubeless to work. Any dust or debris prevents the tape from sealing properly, causing slow leaks.
Remove any old tape or residue with isopropyl alcohol or degreaser, avoiding harsh solvents. Wipe the entire rim bed thoroughly, paying special attention to edges where the rim channel meets the sidewalls.
Once clean, inspect the rim for damage:
- Small cracks or splintering at the bead seat
- Dents or compression marks in the rim bed
- Loose carbon fibres or delamination
Minor surface marks are normal. Deep cracks mean the rim isn't safe for tubeless use.
Let the rim dry completely before applying tape. Moisture trapped under the tape creates air pockets that break the seal.
Carbon rims have narrower rim beds than aluminium equivalents, so tape must sit flush without bunching. Centre it properly, rushing this step causes most installation failures.
Applying Rim Tape Correctly to Carbon Rims
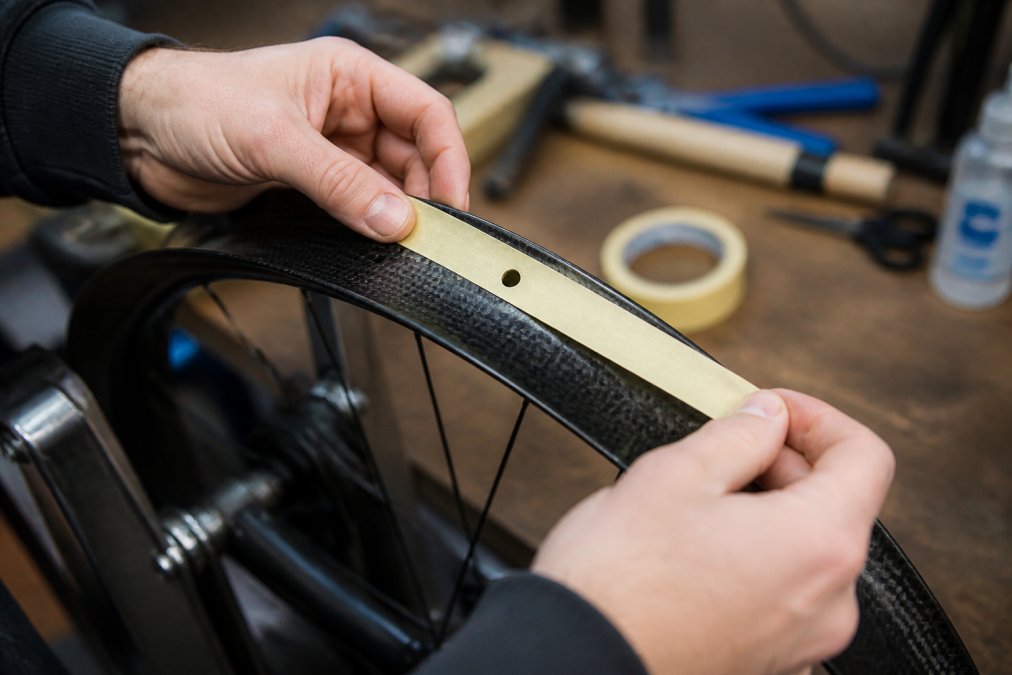
Rim tape application separates successful setups from leaky disasters. The tape must seal every spoke hole while staying flat against the rim bed.
Start at the valve hole, peeling back the backing slowly while applying tension. Work around the rim in one continuous motion, overlapping the tape by about 5mm at the valve hole before cutting.
Common mistakes: wrapping tape too loosely (shifts under pressure), bunching at rim edges (creates air channels), applying to a dirty rim (dust prevents adhesion), and using non-tubeless tape.
Press the tape firmly across the entire rim bed using a roller or your hand. Pay extra attention to spoke holes, any gap allows air to leak.
For carbon rims, avoid stretching tape excessively. Carbon flexes slightly under pressure, and overstretched tape cracks. Apply firm, even pressure instead.
Let the tape set for 10-15 minutes before moving to the next step. This allows the adhesive to grip properly.
Installing the Tubeless Valve Stem and Matching Valve Length
Valve stem length is the most commonly miscalculated variable in tubeless setup. Too short won't seal; too long creates stress that cracks carbon under pressure.
Measuring Your Rim Depth
Measure your rim depth from the bead seat to the top of the rim channel using a calliper or ruler. Most carbon rims range from 35mm to 80mm deep, with modern gravel and road wheels typically between 40mm and 60mm.
Your valve stem should extend 10-15mm above the rim surface. The threaded portion should roughly equal your measured rim depth.
Valve Length Reference Chart
Presta valves come in standard lengths. Match your rim depth to the appropriate stem:
- Rim depth 35-40mm: Use 40mm valve stem
- Rim depth 41-50mm: Use 50mm valve stem
- Rim depth 51-65mm: Use 60mm valve stem
- Rim depth 66mm+: Use 80mm valve stem
If your rim falls between sizes, choose the slightly longer option. You can trim excess stem length with a hacksaw, but cannot extend a stem that's too short.
Installation on Carbon Rims
Insert the valve from the underside until the rubber seal sits flush against the rim tape. Thread the lock ring from the top, tightening until snug (roughly hand-tight). On carbon rims, overtightening compresses the carbon around the valve hole and weakens the structure, do not use a tool.
Continental GP 5000 STR 30's →
Check that the valve sits perpendicular to the rim. Once locked in place, apply a small amount of tubeless sealant around the base where the valve meets the rim tape to seal micro-gaps.
Safe Valve Removal from Carbon Rims
Loosen the lock ring by hand, then push the valve out from inside using steady, even pressure. If stuck, apply isopropyl alcohol around the rubber seal. Never twist or pry sideways, this stresses the carbon. Inspect the hole for cracks; deep cracks mean the rim is unsafe for tubeless use.
Mounting and Seating the Tire Bead on Carbon Hooks
Carbon rims use narrower, sharper bead hooks than aluminium rims. Tyres require careful mounting, forcing a tyre onto a carbon hook can crack the hook or compress the carbon underneath.
Initial Mounting
Apply a thin layer of tubeless sealant to the bead seat area to lubricate the bead. Insert one side of the tyre onto the rim starting opposite the valve stem, using your hands rather than levers when possible, carbon rims scratch easily.
Work the other side onto the hook using plastic tyre levers only, metal levers gouge carbon and create stress concentrations. Insert the lever under the bead and gently pry it onto the hook, moving in small increments. Avoid sudden jerking motions.
The final section near the valve stem is always hardest. If the tyre won't seat, remove it completely and reapply sealant rather than forcing it.
Once both sides are on the hook, check that the bead sits evenly. Run your finger around the rim to feel for gaps between the bead and the hook. The bead should sit flush all the way around.
Safe Removal of Stubborn Tyres from Carbon Hooks
Removing a tubeless tyre from carbon rims is where most damage occurs. Dried sealant bonds the tyre to the rim, and riders often resort to prying with metal levers or twisting the tyre violently, both of which crack carbon.
To remove a tyre safely: (1) Deflate completely. (2) Break the bead seal using a bead breaker tool, working around the entire rim. (3) Apply isopropyl alcohol around the bead and let soak 2-3 minutes. (4) Use plastic levers only, prying gently and incrementally. (5) Alternate sides to prevent binding. (6) Inspect for cracks or splintering, deep damage means the rim is unsafe for tubeless.
Why Carbon Hooks Require This Care
Carbon is strong but brittle. A metal lever prying on a carbon hook concentrates force on a small area, risking a fracture that weakens the entire rim structure and can propagate over time.
Plastic levers and lubricant distribute force over a larger area and reduce peak stress, preserving the rim's structural integrity.
Best Tubeless Sealant for Carbon Wheels and Application
Tubeless sealant seals small punctures and fills gaps between the tyre and rim. The right sealant makes the difference between a reliable setup and one that leaks constantly.
Choose sealants formulated for your climate: latex-based for warm, dry conditions; synthetic for cold or wet weather.
Pour the sealant through the valve stem using a small funnel. Most setups need 60-120ml per tyre, depending on tyre width and rim depth. More sealant doesn't equal better sealing, excess weight and rolling resistance increase without adding protection.
Once sealant is in, inflate the tyre to about 40 psi and rotate the wheel in all directions.
How to Seat Tubeless Tires Without a Compressor
Most riders assume you need a compressor to seat tubeless tyres. A quality floor pump works just as well if you have a good seal at the valve.
Troubleshooting Tubeless Tire Leaks on Carbon Rims
Slow leaks are the most common problem with tubeless setups. A tyre that loses 5-10 psi overnight indicates a leak somewhere in the system.
Start by identifying where the leak is coming from:
- At the bead: Spray soapy water around where the tyre meets the rim. Bubbles here mean the bead isn't sealed properly.
- At the valve: Check the lock ring. On carbon rims, avoid overtightening, just snug it enough to hold the stem in place.
- Through the rim tape: If bubbles appear over spoke holes, the tape has shifted or doesn't have full contact with the rim.
- Through the tyre itself: Small punctures seal themselves within minutes as sealant fills the hole. If the leak persists after 10 minutes, the puncture is too large for sealant to handle.
Frequently Asked Questions
Can I put tubeless tires on any carbon rim?
Not all carbon rims are tubeless-ready. Your rim must have a hooked or hookless bead seat designed for tubeless use, and the rim bed must be smooth and free of spoke holes. Check your rim's specifications or contact the manufacturer. STOXbyHand's carbon wheelsets, such as the 45 FWT Wide Carbon Spoked wheelset, are engineered for tubeless installation with proper bead retention and rim tape compatibility.
What's the best tubeless sealant for carbon wheels?
Revo-Sealant is recommended for use with Continental GP5000 STR tubeless-ready tyres.
How do I seat tubeless tires without a compressor?
Use a floor pump with a high-volume head and seal it firmly against the valve. Pump rapidly in short bursts to build pressure quickly, this helps the tyre bead snap onto the rim hooks. Once you hear the bead pop into place (usually around 40-50 psi), continue to your target pressure. If the bead won't seat, try soapy water on the tyre sidewall to reduce friction, then retry with firm, fast pumping.
Why is my tubeless tyre losing pressure on carbon rims?
Common causes include incomplete bead seating, insufficient or dried sealant, rim tape gaps, or a valve stem that's not fully tightened. First, visually inspect the tyre bead around the entire rim for gaps. Burp the tyre by squeezing the sidewall to redistribute sealant and reseat the bead. If pressure still drops, add 15-20ml of fresh sealant and rotate the wheel to coat the puncture site. Check that your valve core is tight and your rim tape covers all spoke holes completely.